Friends have been mailing to ask how I work with my dots and dashes and make them look like light and reflections. I promised on FB that I would make a canvas and walk them through my process. So, I decided on this simple painting as a demonstration :-)
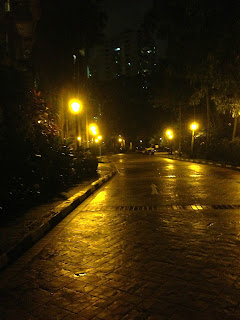
This is the path that you take to walk up to my apartment complex at Thomson 800. When it rains, and the beautiful street lamps throw their reflections, the walkway with its cobbled stones, takes on the charm of an old quaint street somewhere in a European city...
The other day when it rained, I shot this photo of the walkway. I am going to use it as my "base" to work with. When I say base, I mean it becomes the idea for the canvas. I am not a photo realist and I like to make the picture " my own". As the work progresses, I change colours and add details that might not be there. Artistic license ;-)

This photo is dull but I will use it to give me an idea of the lights and their reflections.
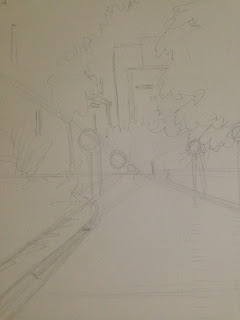
1.) I first make a pencil sketch of the scene. Using perspective lines, I draw the walkway and the streetlights. The building at the back is Braddell View, another apartment complex.

2.) I start by blocking in the darker values. I love this bit. The fun of being an expressionist lies in the freedom to cross hatch and patch the strokes how you like ( of course, experience plays a big role here! ). Go with the flow for now...Around the streetlights, the values are lighter because the foliage is lit up by the lights.

3.) The sky is painted in darker blues and purples. I fill in some reds and yellows on the left side.
I leave the streetlights canvas white for now.

4.) Ok, this photo of the painting got messed up because of the lighting. It suddenly got super sunny outside and the studio was bathed in light. Anyway, as you can see, I filled in basic browns and mossy greens for the walkway and also added some pale yellowish white for where the reflections will be.

5.)What I have done next is the fun part. Taking a thin brush, I dipped it in pure white and put dabs. Here and there. If you look at this photo up close, you will see that the dabs now represent lights! I also detailed the building at the back. The tiny white spots have now become lights at the windows...

6.)I detail the foliage on the right. Tiny mossy green dabs around the streetlights highlight the leaves of the trees.

7.) I highlight the whites on the road and put pure white dabs in the middle of the streetlight to make them bright white. And well, we are done! ;-)
As you can see, I have made the photo from which I worked with, "my own".
